Product Reports
How to Repoint Masonry
What is Mortar?
Mortar consists of sand, cement and water, which chemically reacts to form a hard material. Mortar is the “glue” that holds together masonry units, such as brick, stone and terracotta, so that the assembly is water shedding. When assembling masonry, the mortar is placed full depth and tooled. While mortar is durable, it does weather, and then maintenance is required to keep the wall weathertight.
What is Repointing?
Repointing is the removal of unsound mortar from the joint and replacement with new sound mortar to match the historic mortar.
Tuckpointing
Tuckpointing, in its traditional meaning, is the placement of mortar in the joint without the removal of mortar, in order to fill the joint and cover over any cracked or missing mortar. This is not a recommended practice, as it does not provide thick enough mortar coverage to be durable.
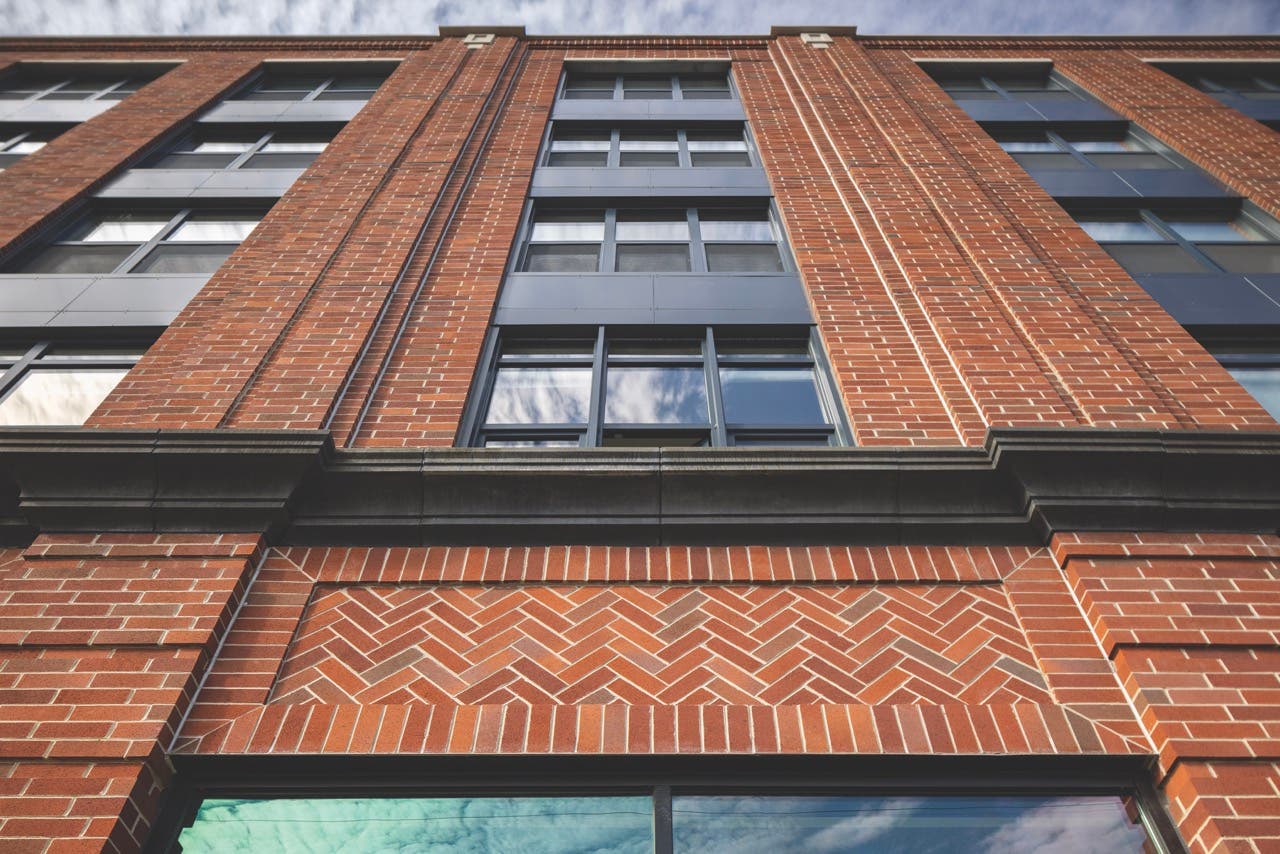
With mortar joints being typically 3/8” wide, and assuming standard size bricks, the mortar joint comprises approximately 16 percent of the area of the masonry surface. With this much at stake, it is critical to get the design of the mortar correct in order to maintain the historic appearance of the masonry.
Mortar: A History
Mortars began 4,000 years ago with mud and clay between stones or man-made bricks. Early lime mortars were composed of mostly lime and sand, sometimes with other additives, resulting in a soft mortar (low strength) that was also slow curing.
In the mid-19th century, natural cements were being added for increased compressive strength. By the latter part of the 19th century, Portland cement was being added, which increased its strength but decreased its porosity and changed its color.
By the 1920s, bagged Portland, masonry and hydrated lime cements, which could be combined on site with sand and water to make mortar, became available.
Causes of Mortar Deterioration
Weathering, including freeze/thaw cycles and acid rain, wears away the exterior face of the mortar. The mortar can crack when subjected to the differential movement of seismic activities and building settlement.
Unmaintained roofs can introduce water into the wall system, resulting in efflorescence, or depositions of salts on the surface of the wall. This same moisture can lead to the accumulation of dirt and biological growth, which expedites weathering of the mortar. Finally, a previous badly done repointing job with inappropriate mortar or a lack of joint preparation can lead to damage of the substrate masonry units.
Approaching a Repointing Project
To ensure that the repointing project is correct, start with a mortar analysis of the historic mortar to determine the compressive strength, type of cementitious binder and the sand colors and gradation. The results will aid in selecting the components to prepare a mortar “recipe” in accordance with ASTM C270.
The mortar needs to be strong enough to keep the masonry units together, yet weak enough to be sacrificial, so as not to damage the masonry unit with building movement. The porosity of the mortar dictates its ability to promote drying of the masonry, its second key function. The mortar needs to be dense enough to be weathertight, but porous enough to “breathe,” permitting the moisture in the wall to get to the surface and evaporate out.
To match the existing color, sand typically gives its historic appearance. Match the sand extracted from the mortar analysis for gradation, granule shape and color distribution. When a matching sand can’t be easily sourced, sometimes there is a rush to use colorants to produce the color match. This additive changes the composition of the mortar and needs to be considered as part of the aggregate quantity. If used, colorants must be colorfast to prevent staining of the building.
Mortar Materials
Cement is the binder in the mortar and can be one of many types. The mortar analysis should determine which of the cements should be used.
Lime is traditional, produced by burning chalk or limestone. The resulting pure calcium oxide is referred to as quick lime, an unstable white powder that is highly reactive to CO2 in the air. If slaked with water, it will combine to make lime putty, or hydrated lime.
Lime putty is non-hydraulic (cures with carbon dioxide (CO2) in the air), very soft, very slow to cure and is flexible, permitting some movement in the masonry with the mortar cracking. It can be kept indefinitely if kept covered with water.
When limestone that contains silicon, magnesium, aluminum and iron is burned, it results in lime mortar, which is still a non-hydraulic mortar. This can be mixed with a pozzolan, such as ash or brick dust, to make a hydraulic mortar (cures with water).
Mortar Components
Mortar strength is coded with obscure letters, but there is a key – MASON WORK. ASTM C270 specifies the “recipe” for each of these mortars, along with the minimum compressive strength to be achieved, as follows:
M – 2,500 pounds per square inch (psi)
S – 1,800 psi
N – 750 psi
O – 350 psi
K – 75 psi
Natural Hydraulic Lime
Natural cement, or Natural Hydraulic Lime (NHL), is similar, except it is derived from burning a particular limestone known as “clayey marls,” in which silica and alumina are naturally occurring. It is these trace elements that render its initial hydraulic set and makes it stronger than non-hydraulic lime mortars. NHLs have no pozzolans added.
The most modern cement is Portland, made from burning limestone with silica and alumina at high heat, driving off the water and carbon dioxide. The resultant clinker is ground to a fine powder and mixed with gypsum to make a bag mortar. It is not suitable for repair mortars, since its hardness can damage the softer bricks and stones, while its lower porosity prevents the drying out of the masonry, leading to freeze/thaw damage.
Water: Make Sure It's Pure
The last component is water, which needs to be clean and potable. If it contains salts or other impurities, it can cause efflorescence, or interfere with a proper bond.
When to Repoint
Determine if the building requires cleaning before proceeding with repointing. Where there is a lot of soiling, lichen, moss, vines and so forth, cleaning before repointing ensures that all deterioration is visible. It also ensures that the new mortar has a clean, sound substrate with which to bond. Additional mild cleaning may be necessary after the repointing work is complete to remove mortar smears.
When determining whether to partially or fully repoint, assess the quantities of joints that are failing. If there are 10 to 50 percent of joints deteriorated, repoint 50 percent. If more than that, repoint 100 percent.
If there are several different colors of mortar present, it is likely time to fully repoint the building. It is difficult to accurately survey the whole building, and using this guideline will provide consistent quantities to get equal bids, with fewer change orders. Further, cost of access to repoint (scaffolding, swingstage or manlift) is a large part of the cost to repoint, and remains much the same whether partially or fully repointing.
The Repointing Process
Repointing is the process of removing the deteriorated mortar from the joint and placing new, sound mortar. Methods to remove the mortar may involve masonry saws, plunge reciprocating saws and hammer and chisels, depending on the size of the joint and the hardness of the mortar.
STEP 1: Removal of the mortar should only be done by experienced masons, and at no time should the tool remove any of the masonry unit. Special care needs to be taken for short vertical joints or very thin joints to avoid damage to the masonry.The joint needs to have mortar removed to a depth of 3/8” minimum, or three times the width of the joint, whichever is greater.
STEP 2: The cut-out joint must be squared off and cleaned out; not be left with a V or U configuration; and have no dust or unsound mortar present. Rinse out the joints to remove dust.
STEP 3: Mix sand, cement, and water to a consistency of peanut butter. Quantities need to be carefully measured to ensure consistent appearance. Ideally, it should be mixed in a mechanical mixer for best workability.
STEP 4: Once the joint is moist, without standing water, compact the mortar in ¼” layers, or “lifts,” into the joint. Keep the mortar within the joint and avoid any smears or droppings on the masonry units. Once the mortar is “thumbprint hard,” tool the joint to match the existing profile. Once the profile is achieved, if the project is for a partial repointing, the new joints can be made to look more like the weathered joint by taking a mason brush and tamping the surface of the joint, perpendicular to the surface, to remove the “cream” and bring the aggregate to the surface.
STEP 5: Control the mortar shrinkage. When repointing historic buildings, it is critical to control the mortar shrinkage. Part of the solution is to ensure the aggregates are well gradated, with the largest granules no larger than 30 percent of the mortar joint. Using a stiff mortar and hydrating every 3-6 hours over several days after placement is critical to prevent shrinkage cracks.
Issues
- Use mock-ups to confirm competency of the masons for removing joints.
- Have mock-ups prepared to ensure that the appearance is correct. Providing the “recipe” from the mortar analysis assists in this process. Ensure that the mortar is weaker than the substrate masonry to avoid future damage.
- Mortar needs to be porous to permit the migration of moisture through it, permitting the masonry to dry out. Well-meaning laypersons sometimes use sealant to repair cracked mortar in lieu of proper mortar. Sealant will trap moisture, resulting in damage to the substrate.
- Performing masonry work in less than ideal weather conditions negatively impacts the quality of the completed result. Compensating for hot weather or cold weather causes its own problems. If it absolutely can’t be avoided, strictly adhere to the cold- and hot-weather requirements as set out in the Brick In Architecture (BIA) Technical Notes.
Susan D. Turner is a Canadian architect specializing in historic preservation of national registered buildings. She is the Senior Technical Architect for JLK, a woman-owned business specializing in the repair and preservation of historic buildings. She can be reached at sturner@jlkarch.com