Product Reports
6 Common Methods for Metal Finishes
Experienced architects and designers alike ask me many questions about metal fabrication and design, but the one which seems to draw the greatest expression of frustration is “So, how exactly do you finish fine ironwork (or wrought iron), and where can I find that specification or description?” or “What exactly is an oil-rubbed finish?”
There is no doubt that fine wrought iron, much like a fine piece of wooden furniture or cabinetry, deserves nothing less than fine finishing that brings out the character and quality of the craftsmanship and materials. In the case of fine, hand-wrought metalwork, the finish should reveal, in a natural, uncontrived way, the joinery and surface texture of the metal. These elements are as integral to the overall composition as the scroll forms and leaf work that constitute the greater composition.
The Mysteries of Metal Finishes
Ironically, though, the traditional oil and wax finishes which are most effective at achieving that goal, and most desired by knowledgeable clients and architects, are little understood by professionals and metal workers alike. As a result, there is a lot of mythology that surrounds such finishes, their effectiveness, their costs and their ingredients.
Because there is limited information about this finish process and no specifications exist, designers must rely on the knowledge and skills of an experienced metalsmith. In fine metalwork, the finish is vital to the composition and character of the whole and must be taken into account before any fabrication begins.
A common example of this would be a forged and waxed iron railing which has a polished and waxed bronze cap rail. The iron and bronze receive totally different finishes and by their nature, they must be handled differently. Once the fabrication is complete in the shop, they are separated in the finishing area and must be reconnected using screws so that when they meet again on the project site, neither the finish on the iron nor the bronze is compromised by welding, brazing or soldering.
The Importance of Metal Textures
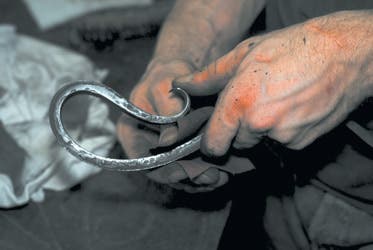
What many of my clients demand is a subtly pitted and distressed metal surface, one which exudes careful handwork but which is not overly distressed so as to appear forced or made by a production machine. The desire for this surface texture is derived from the study of "ancient" railings and gates where the materials were often drawn down from larger bar sizes by means of heat and force, yielding a richly textured surface once it was flat and wire brushed clean.
While ironworkers today have almost every imaginable bar size available to them with a smooth mill finish, this surface texture can be achieved through a variety of simple processes. We prefer to reheat the material, prior to fabrication, and gently hammer the resulting scale back into the surface. The important aspect to keep in mind is the texture itself, not necessarily the method. This step adds labor and therefore cost, but it is essential when achieving an authentic finish.
The next step is to clean the surface and prepare it for finishing. This is often done at the forge using wire brushes while the material is still hot, but in cases where this is not possible or practical, the iron is sandblasted and then wire brushed to bring back a luster prior to applying a wax/oil finish.
Why is surface texture so important in a traditional finish? Well, it is the texture that allows the metal to have depth once a color is applied and burnished. Without a surface texture, the color will simply be wiped off. The pits in the metal allow some color to be left behind during the final steps.
Six Common Methods and Formulas for Metal Finishes
What follows are the six most common formulas for the wax or oil or wax/oil finish ingredients and methods for application. There are of course many others, some of them more mystical or dangerous, but the foundation for good oil/wax finishes is below.
To a clean, wire brushed piece of forged (properly textured) iron apply the following:
1. Raw beeswax is directly applied to warm iron (almost too hot to touch with one’s bare hand) and allowed to melt and penetrate the surface of the metal. After sufficient applications to form a protective coating, use an emery cloth to highlight the metal surface, then polish it with a rag. Last, apply one more layer of wax at room temperature, and buff the surface with a lint-free rag. It is important to keep the iron at a warm temperature to allow the wax or wax-oil to penetrate the pores of the metal, but allow it to burn. Since this is a natural material, this finish, like mineral oil, would be suitable for eating utensils.
As with all of the following waxes and oils, heat caramelizes the wax or oils and gives a rich black bronze color to the surface of the metal; using an even heat is important to achieving a consistent color from section to section. Different waxes and oils create different colors as they caramelize, and so experience in juggling all of the variables above is key to identifying your preferred final color.
2. Substitute commercially available Butchers Wax or Johnson’s Paste Wax or color tinted Briwax (or similar) for the above using the same application method. These waxes have additional ingredients that promote faster drying and a harder finish when they dry. Because they have solvents and other compounds that make them more resilient, these are not suitable for eating utensils. Once the emery cloth has highlighted the metalwork, the final coat of clear wax should be applied cold and buffed to a nice luster.
3. Follow the same steps as above, but substitute raw or boiled linseed oil for beeswax and use after the oil dries (raw linseed oil has no dryers – it will be sticky for days or weeks as it dries, depending on humidity and ambient air temperature). After burnishing the hot oil finish using emery cloth, apply a clear wax at room temperature and buff.
4. Substitute tung oil for the linseed oil. I have met several smiths who feel that this finish has enough penetrating properties that it can also be used cold. After burnishing, apply a clear wax at room temperature and buff.
5. Create a proprietary or unique mixture of wax and linseed (raw or boiled) or tung oil using turpentine as a thinner, and apply it in the same manner as 1, 2, 3 and 4 above. The formula I have seen most variations on is: 1 cup beeswax or Johnson’s Paste Wax, 1 cup turpentine and 1 cup linseed oil and 1 tablespoon of Japan dryer. The turpentine thins the mixture to allow for better penetration, and the Japan dryer promotes faster drying of the linseed oil. This oil/wax finish is burnished, and a final coat of clear wax is applied cold and buffed.
6. Add colored waxes or dyes to stain the solution, or waxes or wax-oil mixtures above (usually a brown or black tone).
Caution: For those inclined to try this at home, care must be taken to avoid exposure to burning oil and wax fumes. Some oils and waxes contain volatile compounds that are harmful when inhaled, even when cold. Additionally, mixing oils and waxes requires the creation of a very flammable hot liquid, so it must be done without an open flame – over a double boiler, for example.
The result is a rich, lustrous, colorful and semi-transparent finish that highlights the character and elegance of the metal starting at the very surface of the material. The materials are not expensive, but the process to apply them is fairly labor-intensive so this will be the driving factor in the cost associated with this work. As with any craft skill, the best results are achieved through experience and patience.
In an air-conditioned environment, this type of finish will last for years with little or no maintenance. It is recommended that the metalwork be waxed as often as fine furniture, but this may be excessive in many cases. If a spot of rust develops, simply rub it out with emery cloth and apply a coat of clear wax. Then wax as needed to maintain the finish. If the work at hand is exterior and not exposed to a lot of weather, the finish will perform well there too, but use caution or expect more regular maintenance of the metalwork if it is exposed to weather.
To realize your ideal finish, insist on samples which show some of the typical joinery using actual materials as they will be executed. The larger the better, as almost anyone can finish a small stick of material. The proof is in a full-scale mockup.
Doug Bracken is the president of Wiemann Metalcraft of Tulsa, OK, a nationally recognized fabricator of fine quality forged and cast metalwork. He holds a B.Arch from the University of Southern California and is a frequent presenter at the Traditional Building Exhibition and Conference and the METALfab Convention & Trade Show (sponsored by NOMMA). His writing can also be found in Ornamental and Miscellaneous Metal Fabricator magazine.
Doug Bracken is the President of Wiemann Metalcraft of Tulsa, OK, a nationally recognized fabricator of fine quality forged and cast metalwork. He holds a B.Arch from the University of Southern California and is a frequent presenter at the Traditional Building Exhibition and Conference and the METALfab Convention & Trade Show (sponsored by NOMMA). His writing can also be found in Ornamental and Miscellaneous Metal Fabricator magazine.


