

Features
Historic Window Repair: Sash Joint Dutchman
All photos by the author.
Repairing historic wood windows can be achieved with a step-by-step process. The window sash repair described here was part of a larger window preservation and barn repair project at the historic Sabbathday Lake Shaker Village in New Gloucester, ME. While working on the windows we could see they were entirely hand crafted, not factory made products. We did some research and determined that the windows were probably made onsite by Shaker craftsmen in the late 18th or early 19th century for an earlier building, and then re-used in the Shaker horse barn in the late 19th century.
On this project we had guidelines from the Shakers to do effective low-cost repairs that respected the historic character and cultural significance of these windows. Eldon Lindamood worked along with me as an intern craftsman. In our work we followed this guiding principle from the national Window Preservation Standards:
“Window Preservation is maintaining, repairing and upgrading older and historic windows. This is a creative process that depends on knowledgeable and skilled workers. A typical window preservation project saves all the existing windows. The emphasis is on craftspeople earning a living by doing best work, providing for the needs of the occupants and the building owner, while sustaining local economies.” – “National Window Preservation Standards,” 2013, page 6.
Repairing Historic Wood Windows: Sash Joint Dutchman Procedure
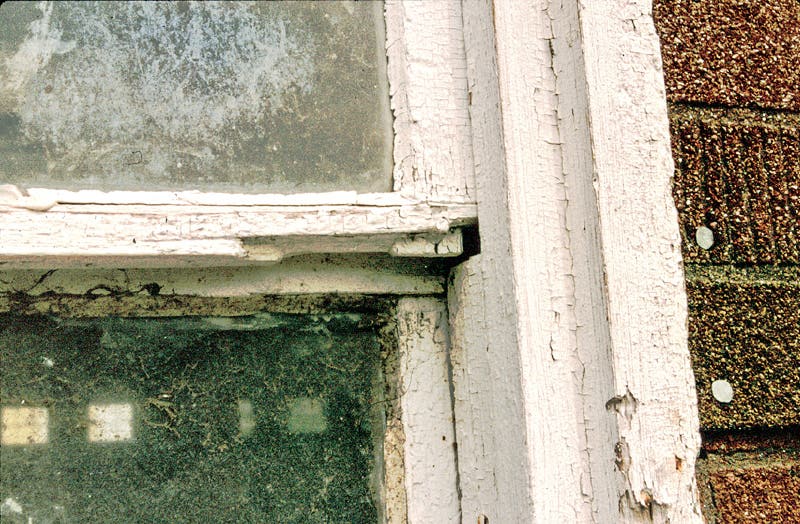
Step 1. Assess Conditions (see top image)
During the window conditions assessment, I noted this broken joint between the meeting rail and the stile of the upper sash and scheduled the sash to be pulled and taken to the shop for repair.
Step 2. Plan the Repair
Here the sash has been deglazed (glass pane removed) and the heavy paint buildup has been removed so I can get a clear view of the damage. A piece of wood has been split off of the end of the rail, leaving part of the tenon and wooden peg exposed. All the remaining wood is sound.
Step. 3 Disassemble the Sash
Most old sash are made with mortise and tenon joints and can be taken apart. Here I tap the wooden pegs out of the joint with a hammer and drift pin. Traditionally glue was not used in sash joints. The sash makers knew that the joints needed to flex and move a bit for long-term durability. Glue would limit that flexibility and trap moisture leading to decay. An advantage is that we can now easily take apart the sash for repairs.
Step. 4. Dutchman Layout
The dutchman will lap onto adjacent sound wood. The laps are half the thickness of the stile and at least three times longer than the width of the stile. The end of the dutchman is beveled underneath the old sound wood just for a little more strength in the connection.
Step 5. Shape the Socket
I saw the end of the socket with a fine toothed crosscut saw and flatten the bed of the socket with a chisel. With sharp tools and practiced woodworking skills on a few dutchmen this task goes much faster than if using power chop saws and routers. It’s true, the power tools could step up the production rate if there are dozens of dutchmen to do at the same time, but here I used hand work because it is more controlled and less likely to damage the original wood.
Step. 6 Make the Dutchman
I use wood of the same species, in this case Eastern White Pine. This is old-growth wood. I select for straight grain, all heartwood, even trying to match the growth ring count per inch. I definitely match the ring orientation, here on a slanting diagonal. If the ring orientation is not matched the old wood and new wood will expand and shrink in different directions, potentially stressing the joint resulting in a loose or open joint. The dutchman is shaped to fit the beveled end and flat bed, and is oversized a bit.
Step. 7 Glue Up
Here I’m using two-part epoxy materials as a primer and adhesive system. First I treat the bare wood with an epoxy consolidant to act as a primer, then I apply a gap filling epoxy paste. Only light clamping pressure is needed with this epoxy adhesive system.
While I used modern epoxy materials on this repair, I have seen century-old sash dutchmen repairs still performing admirably. They were simply made with new wood lapped onto old wood as shown here, fastened with two wood screws and no adhesive. Some of the joints were filled with lead-paste. The lead paste was used to keep water out of the joint and prevent decay. I would not use lead-paste now, but have used wood screws with zinc paste as an effective substitute. This method of fastening is holding up well.
Step 8. Trim and Shape
First I hand plane the dutchman’s surface to be exactly flush with surround surfaces and then layout the mortise with a square and straight edge. I can chop out up to four mortises with a chisel and mallet in the time it would take to set up my mortising machine.
Step 9. Reassembly
Here I’ve drilled a hole for the wooden peg. In this case, the old original peg was made out of Locust wood. Even though it’s two centuries old, it was still good, so I reused it.
The sash was primed, reglazed, painted and put back in the Shaker horse barn.
Specifications: Installation vs. Creation
So, how can you specify this method for your projects? You can’t.
As you see in the above procedure, this repair is an act of CREATION. A craftsman uses his skill and knowledge of basic materials, wood and epoxy resin, to create something that did not exist before: an effective repair. What makes this repair effective and successful is not the wood or the adhesive; it is the skill and knowledge of the worker who created the repair.
How does specification work? As a project planner or designer you select a product, a contractor buys the product and a tradesperson installs the product. This is an act of product INSTALLATION. Of course, this can work very well with a factory-made product, like a plastic window going into a new building. A tradesperson can read the spec and install the product. And you may even get a known result.
For a repair like the one above, to simply specify the installation of a particular wood product, and a particular adhesive product, would not give you any assurance of an effective durable repair. Over the decades I have personally seen this attempted as a tradesman, a contractor, a specifier, a consultant, and a building owner. I can assure you that failures outnumber successes.
You can try to specify it if you like. Write dozens of pages of specs. Include boilerplate from the manufacturers, and even more boilerplate from the window specialists themselves. No amount or quality of specification can do it because an Act of Creation cannot be specified.
So, how do you get this creative preservation work done on your projects?
- First, select the skilled, knowledgeable creative craftsperson who knows how to use basic materials to provide known and proven results.
- Include the craftsperson in an early design phase of the project to help plan the work.
- Assure the craftsperson will be well paid.
- Ask that person to demonstrate their work in a preliminary project phase with mockups or sample work.
- Make the mockups or work samples part of the main contract.
- Follow through with effective supervision to assure the work matches the samples.
Repair Methods Considered
Wood Dutchman: Remove the stile from the sash by drifting out the wooden pegs and disassembling the mortise and tenon joints. Even up the split wood surfaces. Make a wood dutchman to fit the void and glue it in place. Make a new mortise in the dutchman. Assemble the repaired stile onto the sash and peg it in place. This would result in an “open joint” that could be disassembled in the future.
Whole Part Renewal: Remove the broken stile from the sash. Make an all new stile to match the old exactly in size, shape and function, including mortises and glazing rabbet. Fit the new stile onto the sash and fasten it at the mortise and tenon joints with wooden pegs. This would result in “open joints” that could be disassembled in the future.
Wood-Epoxy Repair: Embed two 3/16-in. dia. fiberglass reinforcement rods in the sound wood to the right extending them through the void of missing wood to the end of the stile on the left. Saturate the interior joint surfaces and exposed split wood surfaces with epoxy consolidant to act as a primer. Fill the void with epoxy paste filler. Trim the cured filler down flush with adjacent surfaces. This repair could be done without disassembling the sash. This would result in a “locked joint” that could not be disassembled in the future.
In this case I decided to use the traditional wood dutchman method because of the historic nature of the sash. From a historic preservation point of view I wanted to preserve as much of the historic fabric of the sash as possible, but also I just felt like respecting the Shaker craftsman who originally made the sash by using a traditional repair method.
Costs: This repair using the dutchman method took 1.1 hours (66 minutes) and used $1.90 in materials. The wood-epoxy repair method would have taken the same time and used $6.50 in materials. A whole new stile would have taken 1.5 hours and used $4.00 in materials.
Durability: I have seen several sash dutchmen and part replacement repairs that were done 110 and 125 years ago, so I think of those as methods with a service life measured in centuries. I have done wood-epoxy repairs like this that are still performing well after 37 years, but I have seen some wood-epoxy repairs that rotten out after just 10 or 20 years. So, I consider these more modern methods to have a proven service life measured in decades.
Finding Craftspeople
Who and where are these creative craftspeople? There are hundreds of historic window specialists who know how to do this work. They are located all across this great land. Here are some resources to help you find them:
Check with your state’s historic preservation office and state-wide non-profit preservation organization. (www.nps.gov/nr/shpolist.htm)
The book, Save America’s Windows, has a directory of hundreds of window specialists, some in every state. (www.SaveAmericasWindows.com)
The Preservation Trades Network can provide a list of its members if you join. (ptn.org)
The Window Preservation Standards book offers guidance in organizing window projects and provides a set of detailed standard methods and procedures. (WindowStandards.org)